Chicha
The world is littered with the bodies of dead “things to do” startups (Sosh, YPlan, etc.). Solving event discovery is hard, something I know from my project Miniguide, a digital guide to Barcelona. A successful events discovery app needs to connect three groups of people:
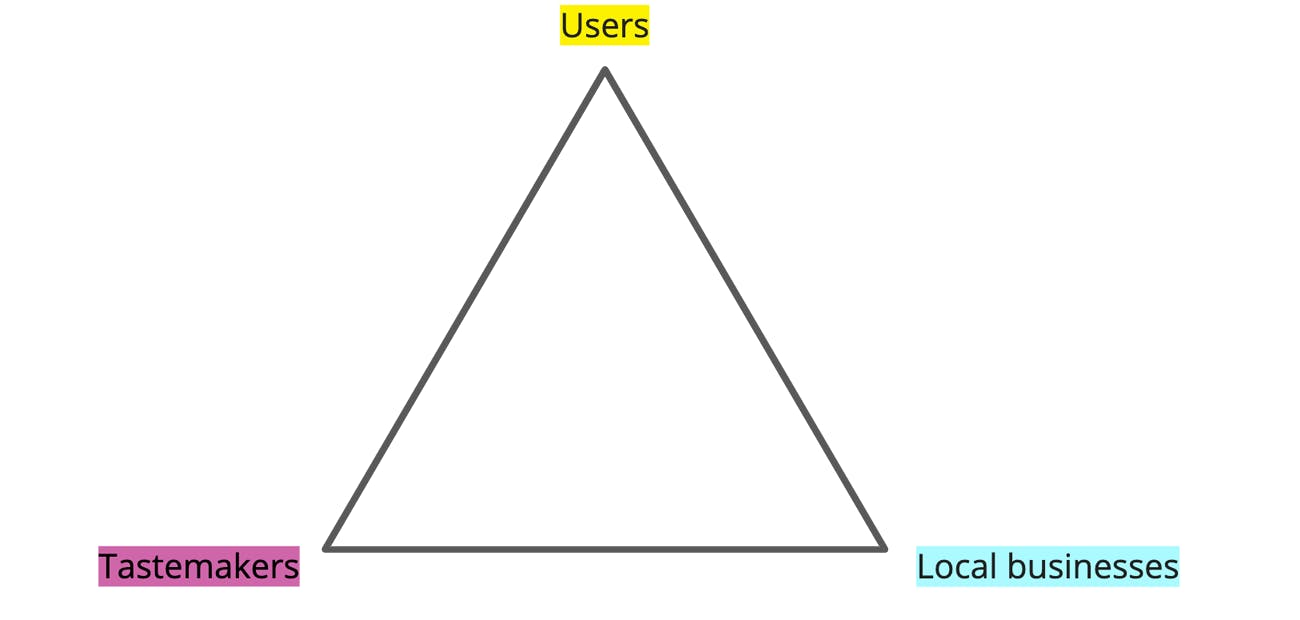
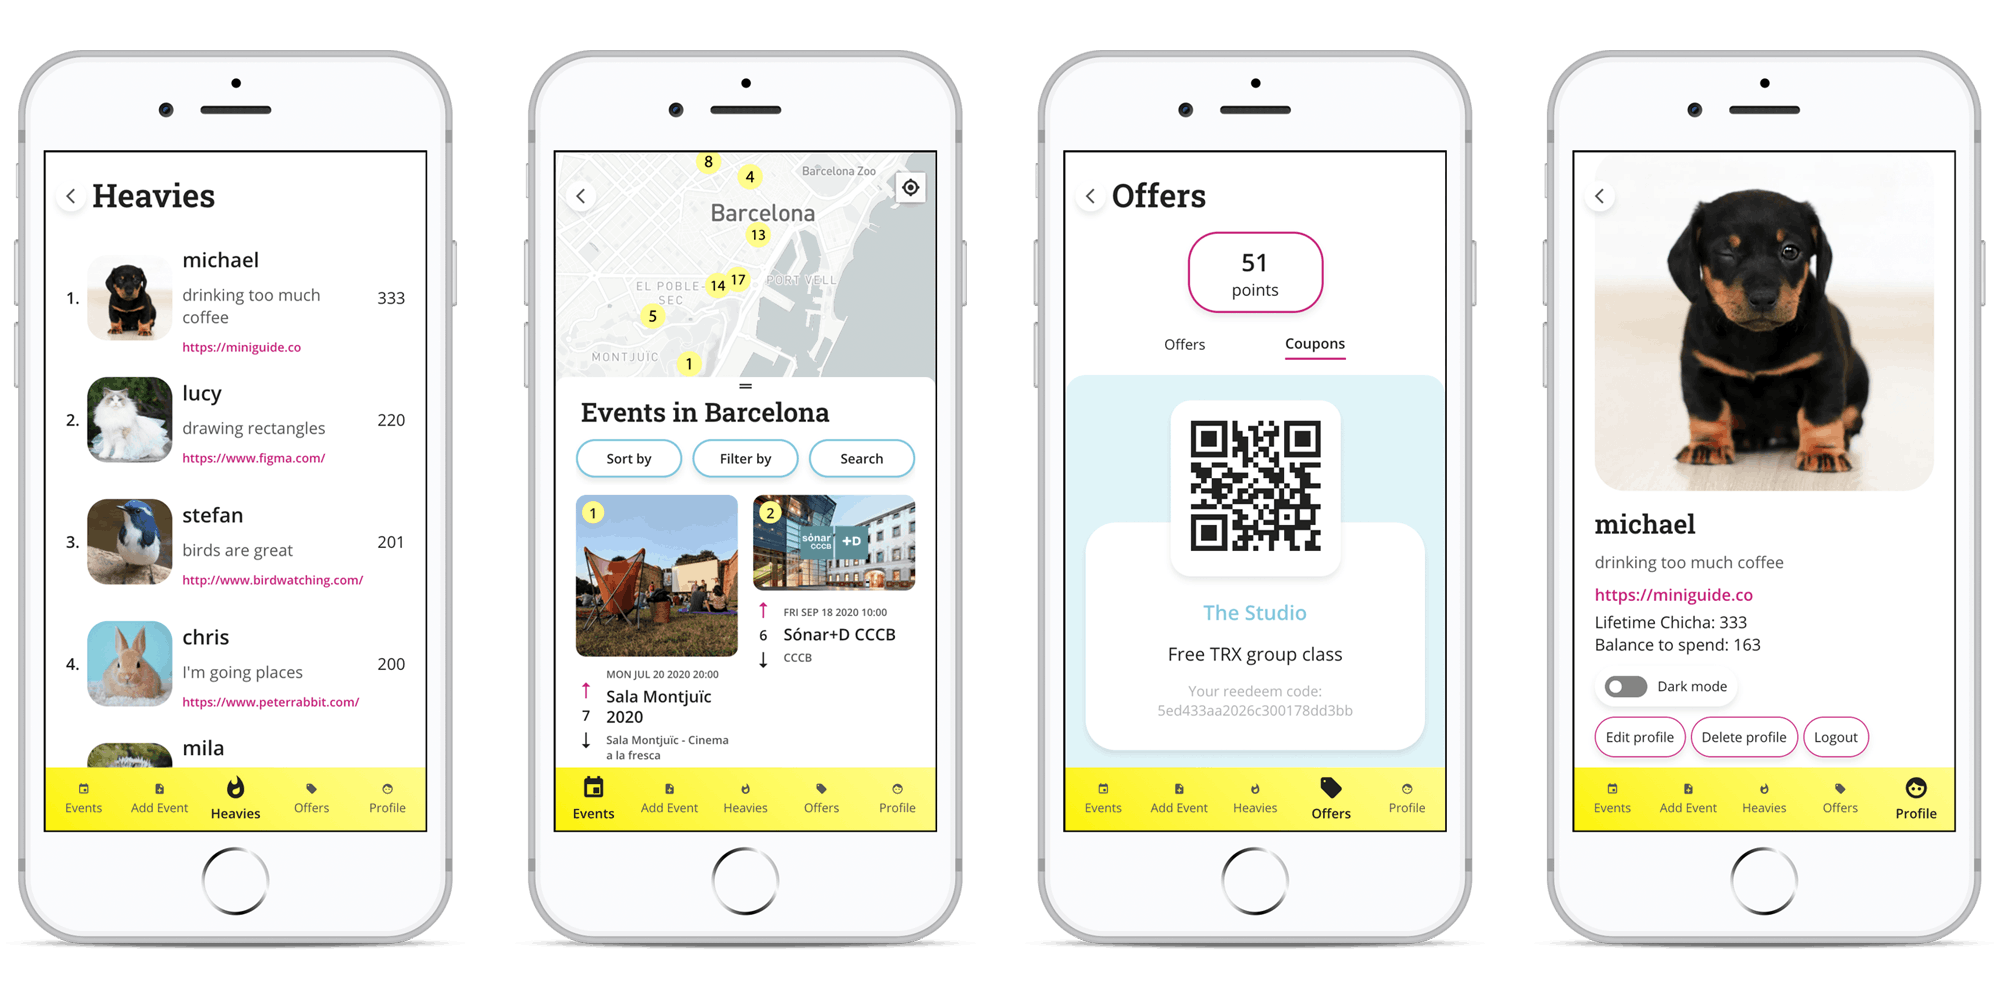
Users want a curated list of events, tastemakers want influence and local businesses want more customers. This served as the inspiration for my final project at Ironhack: Chicha, a web app built in React with a RESTful API created using a Node.js server, Express routing and MongoDB database.
I'm happy with the results, and also proud that Chicha was only the only solo project recognized by the Ironhack jury out of many talented entries. Below please find some highlights.
Links
- Chicha (optimized for dev tools iPhone 8 view)
- API
- GitHub (front end)
- GitHub (back end)
- Wireframes & colors
- Trello
- Presentation

Process
- Visualize product: describe MVP as backlog of user stories tracked in Trello plus bugs and other info.
- Define data model: determine models – User, Event, Vote and Offer – as well as fields and relationships.
- Determine routes: define the back end API endpoints and front end React views (will become components).
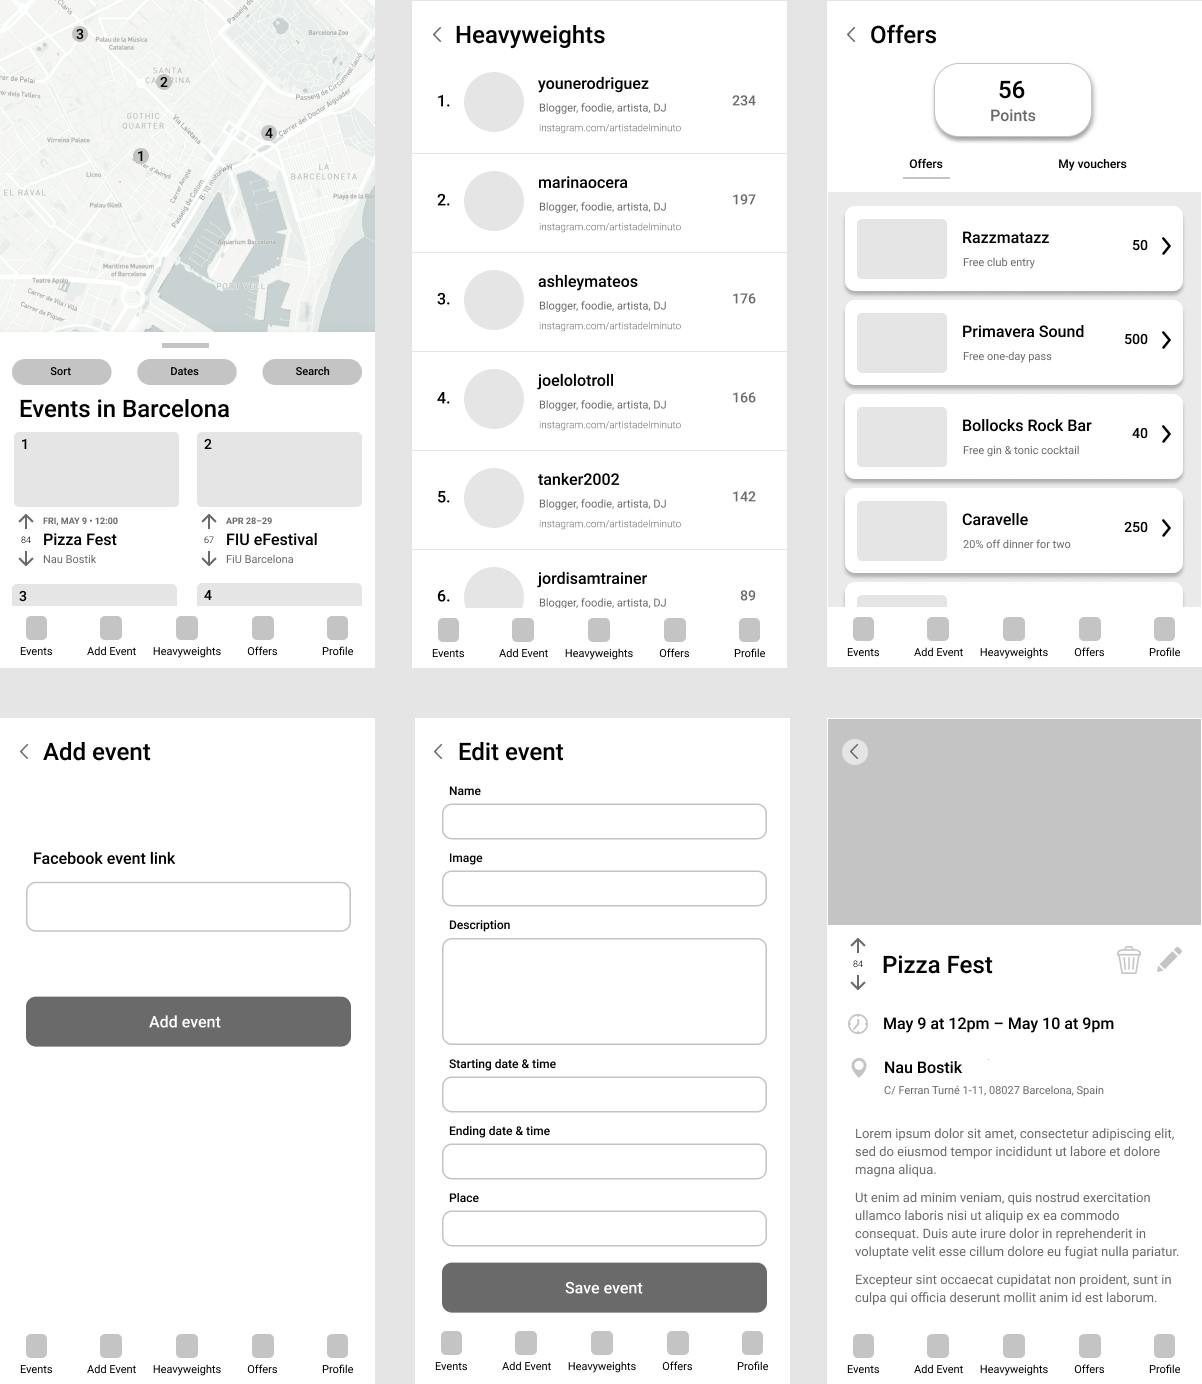
- Create wireframes & prototypes: design wireframes and prototypes (typefaces, colors, etc.) in Figma.
- Configure database: configure MongoDB database in Atlas cloud.
- Scaffold back end: set up Node.js / Express API starter, connect DB, commit to GitHub and deploy to Heroku.
- Scaffold front end: set up React starter (Create React App) and deploy to Netlify.
- Code MVP: following product backlog, develop both front and back end in parallel.
- Apply styles: after MVP functionality is working, write CSS.
- Code additional features: the backlog only grows with time!
Getting data from Facebook
Users add events to Chicha by pasting a Facebook event URL. Following the Cambridge Analytica scandal in 2018, Facebook cut off access to user event data through its Graph API. But you can still access your own event data!
So to work around the restriction, when a user submits an event, the server launches a Puppeteer headless browser instance, logs in to Facebook with my personal user, clicks "interested" on the event and finally the server is able to request the event data from Graph API.
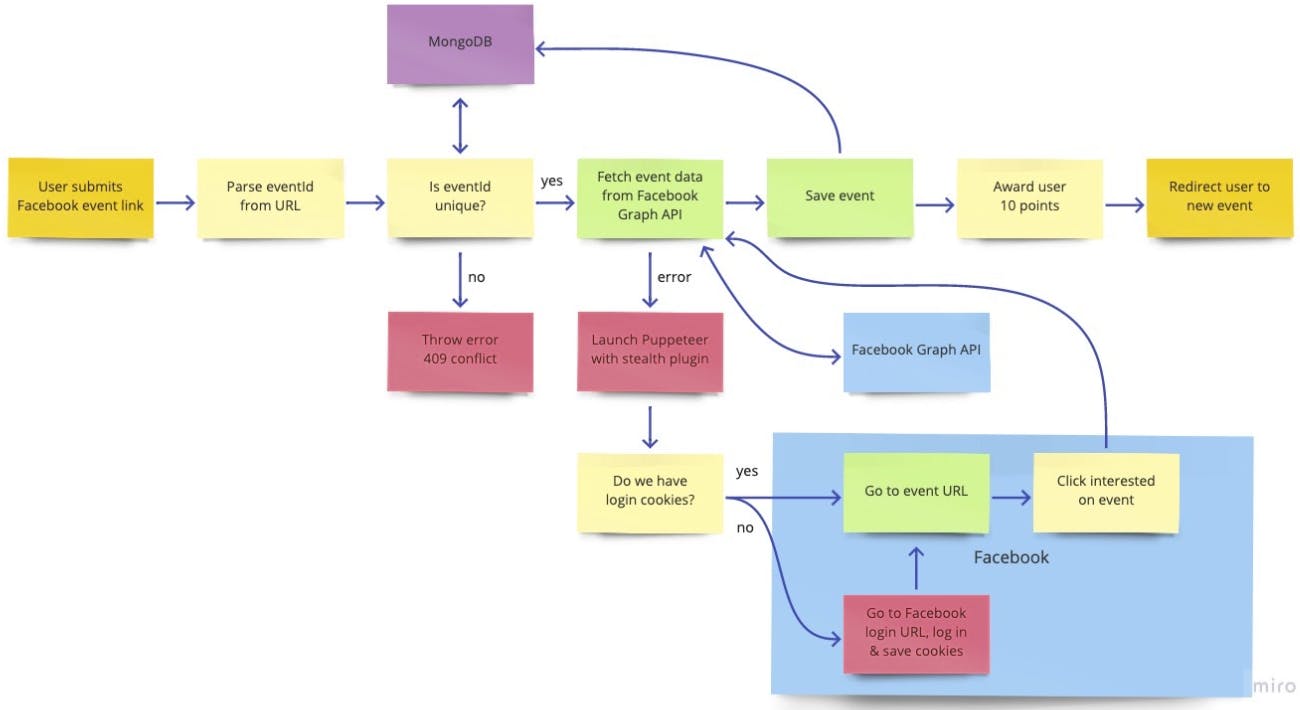
In order to defeat Facebook bot detection, I used the Stealth Plugin for Puppeteer Extra. I also connected using a VPN from the same geographic location where the server (Heroku) is based when running localhost.
The nice thing about this functionality is the user can simply copy a Facebook URL to add an event, no form-filling is necessary. The user can later update the event and modify the details if they so desire.
Here is some of the code on the server that handles the launch of Puppeteer and Facebook login / navigation:
const likeEvent = async (url) => {
  const eventId = getEventId(url);
  const mobileUrl = `https://m.facebook.com/events/${eventId}`;
  const args = [
    '--no-sandbox',
    '--disable-setuid-sandbox',
    '--disable-dev-shm-usage',
    '--single-process',
  ];
  const options = { args, headless: true };
  const browser = await puppeteer.launch(options);
  const page = await browser.newPage();
  await page.setViewport({ width: 800, height: 600 })
  if (Object.keys(cookies).length) await page.setCookie(...cookies);
  await loginToFacebook(page);
  await goToEventAndClickInterested(mobileUrl, page);
  await page.waitFor(1500);
  browser.close();
};

const goToEventAndClickInterested = async (mobileUrl, page) => {
  await page.goto(mobileUrl, { waitUntil: 'networkidle2' });
  const links = await page.$x("//a[contains(., 'Interested')]");
  await links[0].click();
};

const checkIfLoggedIn = async (page) => {
  if (await page.$('#pass')) return false;
  else return true;
};

const loginToFacebook = async (page) => {
  try {
    await page.goto('https://www.facebook.com/login', { waitUntil: 'networkidle2' });
  } catch (error) {
    console.log('error navigating to Facebook login');
  }
  const isLoggedIn = await checkIfLoggedIn(page);
  const isLoggedIn = true;
  if (!isLoggedIn) {
    await page.type('#email', FB_USERNAME, { delay: 1 });
    await page.type('#pass', FB_PASSWORD, { delay: 1 });
    await page.click('#loginbutton');
    await page.waitFor(2000);
    await writeCookies(page);
  }
};

const writeCookies = async (page) => {
  const currentCookies = await page.cookies();
  fs.writeFileSync('./cookies.json', JSON.stringify(currentCookies));
}
Design
Previously I've used Sketch but for this project decided to try Figma for wireframing:
The colors are inspired by Peruvian chicha street art:

For typefaces I used Roboto Slab (serif, titles), Open Sans (sans serif, text) and Material Design (icons). I mixed and matched the following CSS custom properties to create light and dark modes:
:root {
  --near-black: #212121;
  --gray-primary: #565656;
  --gray-lighter: #b2b2b2;
  --gray-lightest: #e4e4e4;
  --near-white: rgba(255, 255, 255, 0.9);
  --yellow-primary: #fef200;
  --yellow-lighter: #ffff8b;
  --pink-primary: #ee2B7a;
  --blue-primary: #59c7de;
  --blue-primary-faded: rgba(89, 199, 222, 0.2);
  --blue-lighter: #7fd5e6;
  --blue-lighter-faded: rgba(127, 213, 230, 0.6);
  --blue-lightest: #ccfcff;
  --heavy-shadow: rgba(0, 0, 0, 0.4);
  --light-shadow: rgba(0, 0, 0, 0.1);
  --white-shadow: rgba(255, 255, 255, 0.15);
}

body.light {
  --bg-color: white;
  --text-color: var(--near-black);
  --text-gray: var(--gray-primary);
  --button-bg: white;
  --control-bg: var(--near-white);
  --blue-bg: var(--blue-primary-faded);
  --light-line: var(--gray-lightest);
  --shadow: var(--light-shadow);
}

body.dark {
  --bg-color: var(--near-black);
  --text-color: var(--near-white);
  --text-gray: var(--gray-lighter);
  --button-bg: var(--near-white);
  --control-bg: var(--near-white);
  --blue-bg: var(--blue-lighter-faded);
  --light-line: var(--gray-primary);
  --shadow: var(--white-shadow);
}
Dark mode
Dark mode is trendy, and for good reason. When you're lying in bed scrolling through your phone, that app better have dark mode!
Dragger
For the events page with the map and listings , I built a drag-to-resize drawer myself instead of importing a package.
Here's the code for the component, which picks up the user's touch when it's near the handle and resizes the drawer until the user lifts their finger:
export default class DragToResizeDrawer extends Component {
  state = { isResizing: false, marginTop: 350 };

  isTouchOnHandle = (clientY) => {
    const distanceBelowHandle = clientY - this.state.marginTop;
    if (distanceBelowHandle < 40) return true;
    else return false;
  }

  onTouchStart = (e) => {
    const { clientY } = e.touches[0];
    const touchIsOnHandle = this.isTouchOnHandle(clientY);
    if (touchIsOnHandle) this.setState({ isResizing: true })
  }

  onTouchMove = (e) => {
    const { isResizing } = this.state;
    const { clientY } = e.touches[0];
    const maxTopMargin = window.innerHeight * 0.8; // map container height is 80vh;
    const marginTop = Math.max(0, clientY < maxTopMargin ? clientY : maxTopMargin );
    if (isResizing) this.setState({ marginTop });
  }

  onTouchEnd = (e) => this.setState({ isResizing: false })

  componentDidMount = () => {
    document.addEventListener('onTouchStart', this.onTouchStart);
    document.addEventListener('onTouchMove', this.onTouchMove);
    document.addEventListener('onTouchEnd', this.onTouchEnd);
  }

  componentWillUnmount = () => {
    document.removeEventListener('onTouchStart', this.onTouchStart);
    document.removeEventListener('onTouchMove', this.onTouchMove);
    document.removeEventListener('onTouchEnd', this.onTouchEnd);
  }

  render() {
    const { marginTop } = this.state;
    const dragHandleStyle = { marginTop };
    const draggerStyle = {
      marginTop: marginTop + 20,
      overflow: this.state.isResizing ? 'hidden' : 'scroll',
      paddingBottom: marginTop + 70,
    }
    return (
      <div className='drag-to-resize-container' onTouchStart={this.onTouchStart} onTouchMove={this.onTouchMove} onTouchEnd={this.onTouchEnd}>
        <div className='drag-handle' style={dragHandleStyle}><i className='material-icons'>drag_handle</i></div>
        <div className='dragger' style={draggerStyle}>{this.props.children}</div>
      </div>
    );
  }
}
QR Codes
Users earn points by sharing events and voting, and can then redeem them for offers at local businesses.
The QR code encodes a coupon ID which may be scanned by an authorized merchant. When the merchant scans the QR code, the encoded coupon ID is read and sent to the server, which checks to ensure the code is valid. Scan dates are stored in the database to prevent the same QR code being used more than once.
API routes
As noted, Chicha has models for User, Event, Vote and Offer with back end Express routing that receives request from the front end React app that allow for CRUD – create, read, update and delete – operations. Below is the code for the front end API service; for the back end API endpoints check my API repository on GitHub.
import axios from 'axios';

class ApiClient {
  constructor() {
    this.apiClient = axios.create({
      baseURL: process.env.REACT_APP_BACKEND_URI,
      withCredentials: true,
      headers: { 'X-Requested-With': 'XMLHttpRequest' },
    });
  }

  whoami = () => this.apiClient.get('/whoami');
  signIn = (body) => this.apiClient.post('/signin', body);
  logout = () => this.apiClient.get('/logout');

  register = (user) => this.apiClient.post('/users', user);
  getUser = (userId) => this.apiClient.get(`/users/${userId}`);
  editUser = (userId, body) => this.apiClient.put(`/users/${userId}`, body);
  deleteUser = (userId) => this.apiClient.delete(`/users/${userId}`);
  getHeavies = () => this.apiClient.get('/users/heavies');

  addCoupon = (userId, body) => this.apiClient.patch(`/users/${userId}/coupons`, body);
  getUserWithCoupon = (couponId) => this.apiClient.get(`/users/find?coupon=${couponId}`);
  redeemCoupon = (userId, couponId) => this.apiClient.patch(`/users/${userId}/coupons/${couponId}`);
  getRedeemedCoupons = (partnerId) => this.apiClient.get(`/users/coupons/find?partner=${partnerId}`)

  getOffer = (offerId) => this.apiClient.get(`/offers/${offerId}`);
  getOffers = () => this.apiClient.get('/offers');

  addEvent = (body) => this.apiClient.post('/events', body);
  getEvent = (eventId) => this.apiClient.get(`/events/${eventId}`);
  getEvents = () => this.apiClient.get('/events');
  editEvent = (eventId, body) => this.apiClient.put(`/events/${eventId}`, body);
  deleteEvent = (eventId) => this.apiClient.delete(`/events/${eventId}`);
  searchEvents = (query) => this.apiClient.get(`/events/search?query=${query}`);

  createVote = (body) => this.apiClient.post('/votes', body);
  getVotes = () => this.apiClient.get('/votes');
  changeVote = (voteId, body) => this.apiClient.put(`/votes/${voteId}`, body);
  removeVote = (voteId, eventId, direction) => this.apiClient.delete(`/votes/${voteId}?eventid=${eventId}&direction=${direction}`);
}

const apiClient = new ApiClient();
export default apiClient;